How Do You Divide a Studio Apartment Into Functional Zones Without Construction?

How Do You Create Separate Zones Without Building Walls?
You just signed the lease. The studio has big windows, decent light, and one single room where everything—sleeping, working, eating, relaxing—has to happen. At first, the open square footage feels like freedom. Two weeks later, you're trying to fall asleep three feet from your desk while the glow from your TV washes over your bed. The whole space feels like a storage unit that happens to have a mattress. This is the studio problem almost every first apartment dweller faces, and the solution isn't buying less stuff or moving to a one-bedroom you can't afford. It's teaching your eye to see boundaries that aren't built from drywall.
Before you move a single piece of furniture, grab a tape measure and sketch your floor plan on graph paper. (Yes, actual paper—your phone's notes app works in a pinch, but there's something about seeing the whole layout at once that helps.) Mark where the windows, doors, radiators, and closets sit. These fixed elements dictate your zones more than any Pinterest board ever will. You can't put a bookshelf divider in front of the only heating vent. You probably don't want your bed right next to the front door where every visitor gets a view of your pillows. Work with the architecture, not against it. Measure the distance between windows, note which way doors swing, and check where outlets live—because your desk zone won't work if you're stretching an extension cord across your sleeping area.
Once you have the measurements, decide which three functions matter most. For most people, that's sleep, work, and downtime. If you cook often, maybe swap work for dining. The point is to be honest about how you live, not how you think you should live. A dedicated office zone sounds great until you realize you always work from the couch with a laptop on a cutting board. Once you know your real priorities, you can start placing anchors—those big pieces of furniture that tell your brain "this area has a purpose." Without anchors, your studio will always feel like a furniture showroom where nothing quite belongs.
What Furniture Works Best as a Room Divider?
The go-to answer is a tall bookshelf, and it's popular because it actually works. An open-backed shelving unit breaks sightlines without stealing natural light. Position it perpendicular to a wall and suddenly you have two rooms where there was one. The beauty is that both sides can look good—face your favorite books toward the living area and use decorative storage boxes on the bedroom side. If your lease is strict about wall damage, secure tall pieces with removable furniture straps. They're designed for babyproofing, but they work just as well for keeping a KALLAX unit upright in a rental.
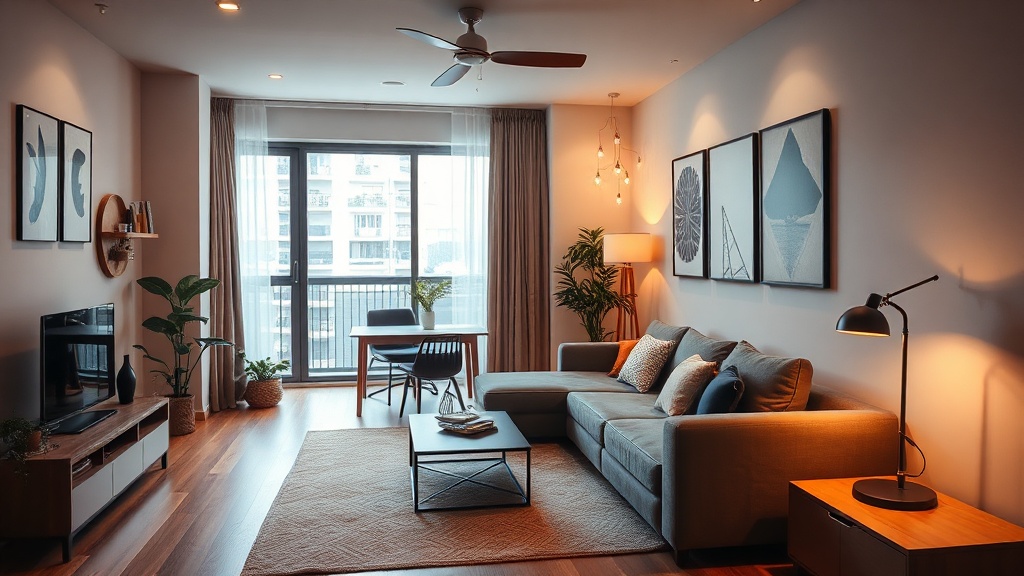
Don't overlook your sofa. Floating a couch so its back faces your sleeping area creates instant division. The back of a standard sofa runs about 30 to 36 inches high—enough to block the view of your unmade bed from the "living room" side without making either space feel like a tunnel. Slide a narrow console table behind it and you've gained a place for keys, mail, or a small lamp. This trick costs nothing if you already own the sofa, and it keeps traffic flowing better than a solid divider would. If your sofa has a low back, add two tall plants on either end of the console to extend the visual barrier.
For tighter spaces, a folding screen or even a tall plant stand loaded with trailing pothos can do the job. The RISÖR room divider from IKEA folds flat when you need open space for entertaining, and it won't damage floors or walls. If you prefer greenery, a tall metal plant stand with multiple levels creates a soft green wall that filters light beautifully. Just be realistic about your plant care habits—brown leaves don't make great room dividers. For more inspiration on dividing small spaces, Apartment Therapy has a solid roundup of renter-friendly divider ideas that won't damage your walls or your security deposit.
Whatever you choose, remember the golden rule: your divider should stop the eye, not the air. Solid pieces that reach the ceiling make studios feel cramped and dark. Leave breathing room above and below your divider so light can move through the space. A good divider creates mystery—you shouldn't see everything at once when you walk through the door.
Where Should You Place Rugs to Define Different Areas?
Rugs might be the most powerful zoning tool that renters ignore. They work subconsciously—your brain reads a rug underfoot as "this is a distinct space" even when the walls don't change. The problem is that most people buy rugs that are too small, which has the opposite effect. A tiny rug floating in the middle of your seating area looks accidental, not intentional. It reads as a bath mat that got lost, not a deliberate design choice.
For a living zone, the rug should be large enough that at least the front legs of your sofa and any chairs rest on it. In a studio, that usually means a 5-by-7-foot minimum, though 6-by-9 is better if your layout allows. For the bed area, the rug should extend at least 18 inches past each side of the mattress. There's nothing worse than swinging your feet onto cold hardwood at 7 a.m. because your rug stopped six inches from the bed. If you're unsure about sizing, The Spruce has a detailed guide to choosing the right rug size for every room in your home.
If your zones sit close together, choose rugs that share a color family but differ in texture. A flatwoven cotton rug under your desk paired with a low-pile wool rug under your seating area reads as coordinated, not competing. Avoid placing two bold patterns next to each other—they'll fight for attention and make the whole studio feel restless. When in doubt, one neutral solid and one subtle pattern is a foolproof combo that won't overwhelm a small footprint.
Leave at least 12 inches of bare floor between zone rugs. This strip acts as a visual hallway, guiding you through the space and preventing the room from feeling like a carpet warehouse. The negative space matters just as much as the decorated areas. Trust the gaps. Your feet—and your eyes—need somewhere to rest.
How Can Lighting Make One Room Feel Like Three?
That single overhead flush-mount in the center of your ceiling is doing you no favors. It blasts every corner with identical light, which makes your studio feel like a doctor's waiting room. Zoning with light means giving each area its own brightness level and color temperature so your brain registers them as separate places. Light is psychological—use it.
Start with your sleeping zone. Swap the overhead bulb for a warm dimmable option—around 2700K—and add a bedside lamp with a fabric shade. The softer glow signals rest. For your workspace, you want cooler, brighter light that keeps you alert. A task lamp in the 3500K to 4000K range does the trick. The IKEA FORSÅ work lamp is under $40, looks polished, and puts light exactly where you need it. For a deeper dive into lighting strategy, Architectural Digest breaks down how to layer lighting in ways that work for rentals and small spaces.
Your living area needs ambient lighting that fills the space without overwhelming it. Floor lamps with upward-facing shades bounce light off the ceiling, which makes the whole zone feel larger. If your landlord allows it, plug-in wall sconces on a dimmer switch add serious sophistication without hardwiring. You can find renter-friendly options that hang from a cord and plug into any outlet, then attach to the wall with removable adhesive strips.
Smart bulbs are especially useful in studios because they let you program scenes. Set an "evening" scene that dims your bedroom to 10% warm light while keeping your kitchenette bright enough to wash dishes. A "focus" scene can blast your desk with cool white light while dimming everything else. These shifts in brightness help your brain switch modes even when the physical space never changes. It's the closest thing to having separate rooms without a construction crew.
Can You Use Curtains to Divide a Studio Apartment?
Absolutely—and they're one of the most flexible options available. A ceiling-mounted curtain track creates a soft wall that slides open when you want the full space and closes when you need privacy. The hardware is lightweight and many systems install with tension mounts or adhesive tracks that peel off cleanly when you move. No drill required.
The key is going floor-to-ceiling. Even if your ceilings are only eight feet high, curtains that reach from the top to the floor draw the eye upward and make the entire space feel larger. Sheer white fabrics filter daylight beautifully while still hiding your unmade bed from visitors. If you need darkness to sleep, opt for heavier linen or a double layer—sheer for daytime, blackout for night. IKEA's VIDGA track system is designed for exactly this kind of flexible partitioning.
For a lower-commitment option, hang a half-curtain from a tension rod placed behind your headboard. It creates a cozy sleeping nook without cutting the room in half. You can also use curtains to hide storage areas—a simple floor-to-ceiling panel on a track can mask open clothing racks or shelves that would otherwise add visual clutter. Out of sight really does mean out of mind in a small space.
Keep curtain colors simple. Dividing curtains are large visual surfaces, and busy patterns will dominate your whole apartment. Stick to solids or subtle textures like raw linen. If you want color, choose something that appears elsewhere in your space so the divider feels connected, not random. The goal is cohesion across zones, not a different theme in every corner.
There's no single perfect way to zone a studio. Start with whatever bothers you most—maybe you can't stand seeing your desk from bed, or maybe you just want a cozier spot to watch movies. Move one big piece. Add one rug. Hang one curtain. Small, deliberate changes add up faster than a complete overhaul, and they're easier to undo if your needs change next month. Your first apartment should fit the life you actually have, not some imaginary version where you sleep in a minimalist pod and work at a standing desk. Work with your real habits, add boundaries where you need them, and let the open floor plan become an asset instead of a headache. The space is small, but that doesn't mean it has to feel small—just intentional.